Is QUIC.cloud a better CDN than Cloudflare or BunnyCDN? How do you setup QUIC using LiteSpeed Cache? Which method should you use to set it up, and should you use QUIC’s DNS?
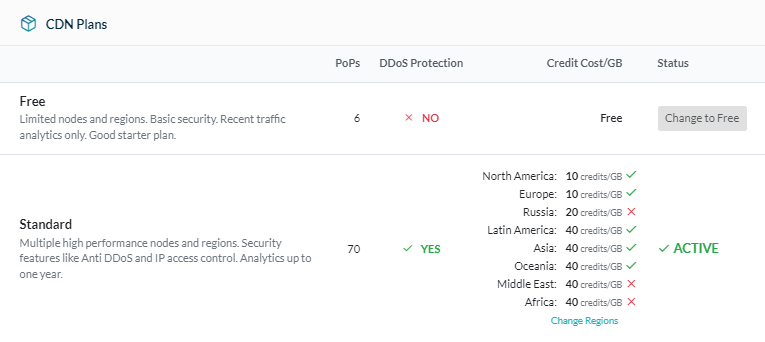
To answer the first question, the paid version of QUIC.cloud (called the standard plan) is much better than the free plan which only uses 6 PoPs in the US + Europe and lacks DDoS protection. The standard plan is more comparable to paid CDNs like BunnyCDN and uses all 81 PoPs with regional pricing (very similar to the pricing of BunnyCDN). In other words, for a free CDN, you’re better off using Cloudflare’s 250 data centers compared to the 6 PoPs on QUIC.cloud’s free plan.
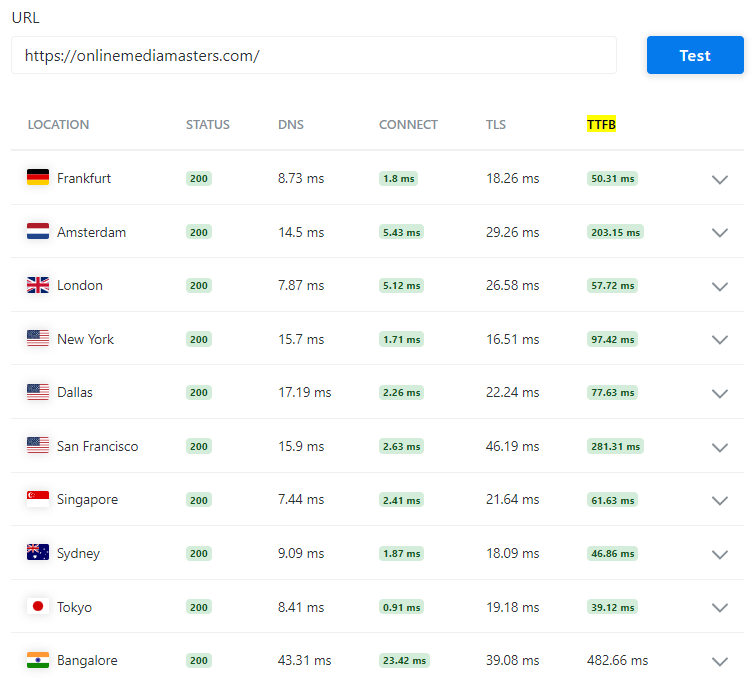
However, a key benefit of QUIC.cloud is it caches HTML (dynamic content) which is similar to Cloudflare’s APO. This can improve TTFB in multiple global locations when testing your site in KeyCDN’s performance test. By default, QUIC.cloud is only setup to cache dynamic assets (caching static assets can be enabled in the CDN config settings of your QUIC.cloud dashboard).
Which means you could use QUIC.cloud to cache dynamic assets, then another CDN like Cloudflare or BunnyCDN to cache static assets. Since Cloudflare and BunnyCDN are listed on cdnperf.com, it’s easy to judge their performance/reliability. But since QUIC.cloud isn’t, it’s hard to know how it compares to other CDNs. Assuming you’re open to using the standard plan (not the free plan with only 6 PoPs), it’s definitely a CDN I would try setting up and testing the results.
- QUIC.cloud vs. Cloudflare vs. Other CDNs
- HTML Caching
- Free vs. Standard Plan
- Setup Instructions With LiteSpeed Cache
- Image, Page Optimizations, And LQIP
- CDN Config Settings
- Final Thoughts
1. QUIC.cloud vs. Cloudflare vs. Other CDNs
Key differences between QUIC, Cloudflare, and BunnyCDN:
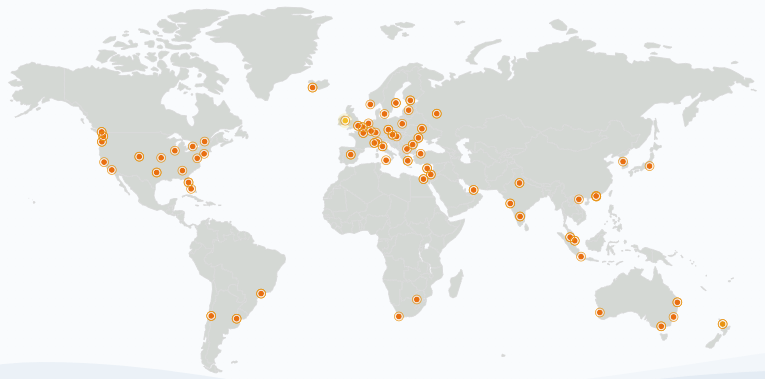
- PoPs – QUIC has 6-81 PoPs depending on whether you use their free vs. standard plan. This is lower compared to BunnyCDN’s 90 PoPs and Cloudflare’s 250. Keep in mind that QUIC is newer and as they grow, they will likely expand their PoPs with more locations.
- DNS – Cloudflare’s DNS is generally faster than QUIC.cloud’s DNS which uses AWS’s Route53 (see dnsperf.com). You can still use Cloudflare or an external DNS with QUIC.
- HTML caching – QUIC.cloud caches both static and dynamic content (HTML) while you would need something like Cloudflare APO or Super Page Cache for Cloudflare to do this. This can make a big difference especially when testing your TTFB in multiple locations.
- Features – all CDNs have a unique set of features that range from DNS to security and speed optimizations. However with many CDNs like Cloudflare, your traffic has to be proxied through their CDN for many features to work (and won’t work on “DNS Only”).
- Pro features – there are major differences between free vs. paid plans in QUIC and Cloudflare. Make sure you understand the differences so you know what you’re getting. There’s also Cloudflare APO, Argo, BunnCDN’s Perma-Cache, and other paid add-ons.
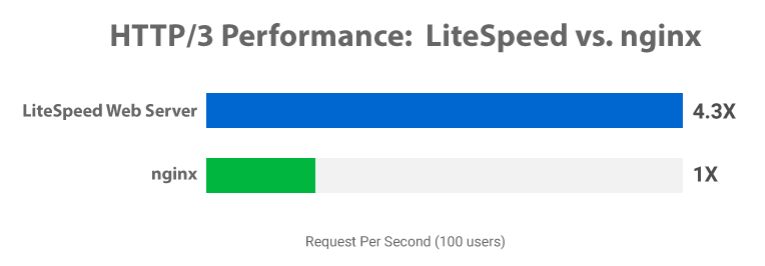
- True HTTP/3 – QUIC.cloud uses “true HTTP/3” while Cloudflare’s HTTP/3 setting has to pull from HTTP/2 and delivers it with HTTP/3 (explained in NameHero’s YouTube video).
- Built for LiteSpeed/WordPress – since QUIC.cloud, LiteSpeed Cache, and LiteSpeed servers were built to work together, it should theoretically be a smoother integration.
- cdnperf.com – QUIC.cloud isn’t listed on cdnperf.com while Cloudflare and BunnyCDN are. StackPath (also by RocketCDN) was removed from cdnperf.com after having issues.
2. HTML Caching
I want to emphasize the HTML caching by QUIC.cloud which is similar to Cloudflare’s APO (both cache HTML).
So why does this matter?
When testing TTFB in KeyCDN’s performance test, you’ll notice it gets slower the further away from the origin server (KeyCDN tests your site in 10 global locations). This is because most CDNs don’t cache HTML. Since QUIC.cloud does, you can do a before & after test in KeyCDN and will notice your TTFB is much faster. Which means you can save the $5/month on Cloudflare’s APO. However, you won’t see the same results on QUIC.cloud’s free plan because it only uses 6 PoPs.
3. Free vs. Standard Plan
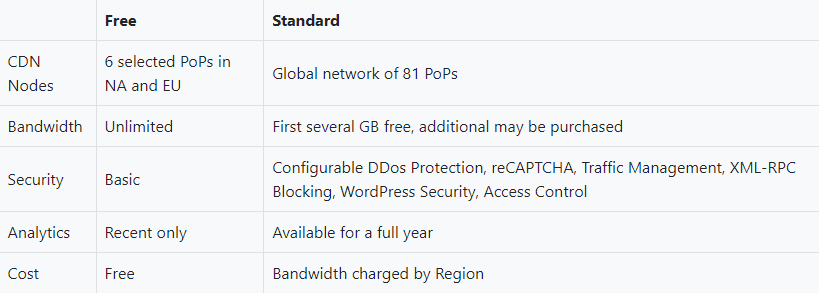
QUIC.cloud explains the free vs. standard plan but it can still be confusing between credits, quotas, tiers, PoPs, and features.
Free plan – includes unlimited bandwidth from 6 data centers in the US + Europe. The exact locations are unknown since these are floating PoPs and depend on factors like network traffic, so you don’t know which PoP locations you’re getting. It doesn’t include DDoS protection either.
Standard plan – 81 PoPs, regional pricing, DDoS protection, and certain quotas/tiers which depend on whether your host uses LiteSpeed servers, Enterprise, or are a QUIC.cloud partner.
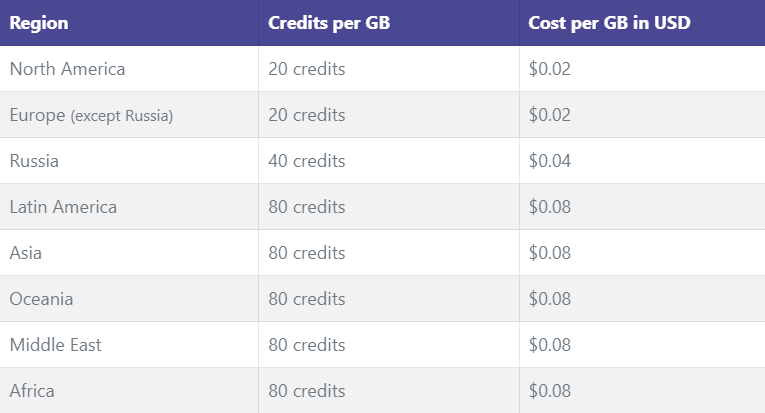
Pricing – CDN costs are 2-8 cents/GB (USD) depending on the region and paid for in credits. QUIC.cloud sometimes has promotional pricing so it may be cheaper depending on the time.
Credits – QUIC.cloud gives you a certain amount of free credits at the 1st of each month. The amount of free credits depend on your tier. Free credits don’t roll over. Once your free credits are used, you’ll need to purchase additional credits from their shop. The more credits you buy, the bigger discount you get. Purchased credits never expire and apply to bandwidth and online services like page optimizations (such as critical CSS + unique CSS generation) as well as LQIP. Quota is just a combination of your free and purchased credits which is applied to your usage.

Tiers – monthly free credits depend on which tier you (or usually your host) uses. Basic plans are non-LiteSpeed while LiteSpeed Server and Enterprise depend on which tier your host uses.

Non-LiteSpeed servers give you the following free services. LiteSpeed servers get 5x what’s listed, LiteSpeed Enterprise get 10x, and QUIC.cloud partners get 20x. So when comparing LiteSpeed Enterprise vs. OpenLiteSpeed, the amount of freebies you get with QUIC is a big one.
- Image Optimization – 1000 Fast Queue images
- Page Optimization – 200 requests
- Low-Quality Image Placeholders – 100 requests
- CDN – number of credits equivalent to the cost of 1 GB of traffic through North America
4. Setup Instructions With LiteSpeed Cache
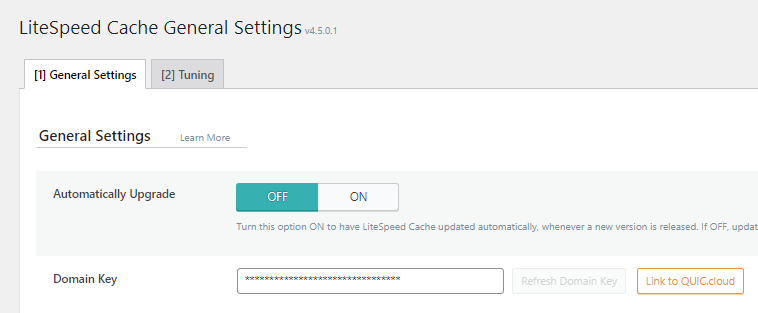
This assumes you already have LiteSpeed Cache installed. You should have also requested a domain key and entered your Server IP in the LiteSpeed Cache General settings. Ryan from NameHero has a video on setting up QUIC (also a solid choice for LiteSpeed hosting). He uses the CNAME method for setting it up, or you can use QUIC.cloud or Cloudflare’s DNS (see step 5).
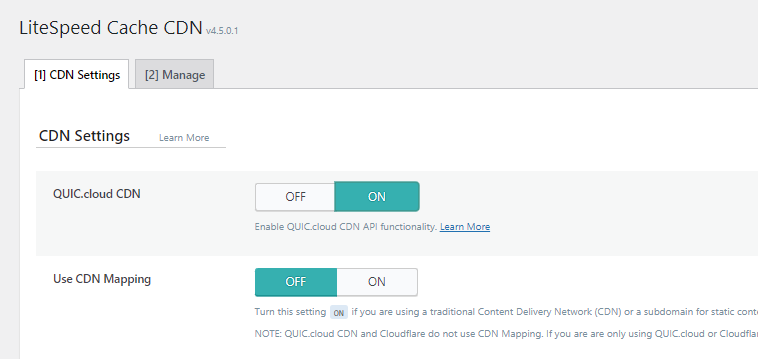
Step 1: Enable QUIC.cloud CDN in the LSC General settings (leave CDN Mapping off).
Step 2: In your LiteSpeed Cache General settings, click “link to QUIC.cloud.”
Step 3: Go to your QUIC dashboard, sign up, and your domain will be added automatically.

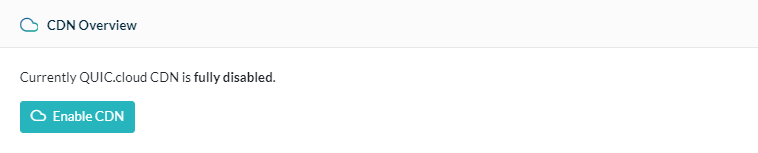
Step 4: Click your domain and go to CDN → Enable CDN.
Step 5: Choose a method for connecting the CDN: QUIC.cloud DNS, Cloudflare DNS, or CNAME (external DNS). QUIC.cloud + Cloudflare’s DNS are both fast, but QUIC.cloud DNS is the easiest.
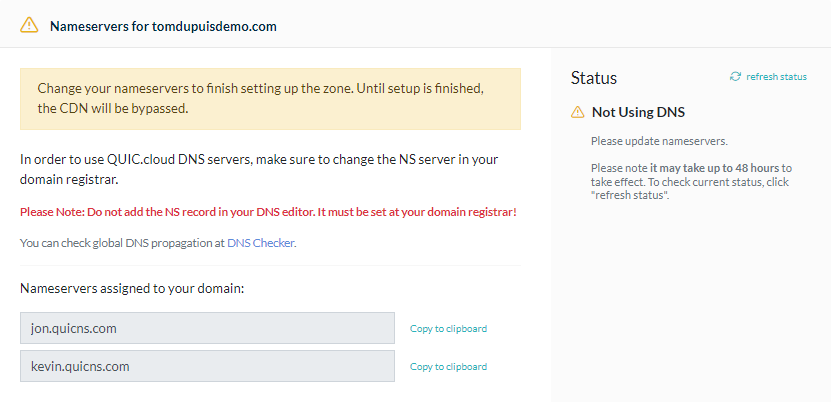
- QUIC.cloud DNS: the easiest method is using QUIC.cloud’s DNS but this means you’ll be using AWS’s Route53 which is usually slower than Cloudflare’s DNS. They will copy your DNS records, then click “enable and add records” and they will assign you 2 nameservers. Login to your domain registrar and change nameservers to QUIC’s. Wait for QUIC to detect the change (i.e. 30 min.) and refresh the page. If successful, you’ll see “Using DNS” in QUIC.
- Cloudflare: LiteSpeed has a video tutorial on this. You will change your CNAME in Cloudflare to the one provided by QUIC.cloud. To do this, go to Cloudflare’s DNS settings and delete the A records for both your www and non-www domain. Next, create CNAME records for www and non-www domains. Make sure you use “DNS Only.” If you have Mail or MX records which use your root domain, you will need to create a subdomain and point the MX record to it. If you have issues, it may be caused by redirects in your .htaccess file.
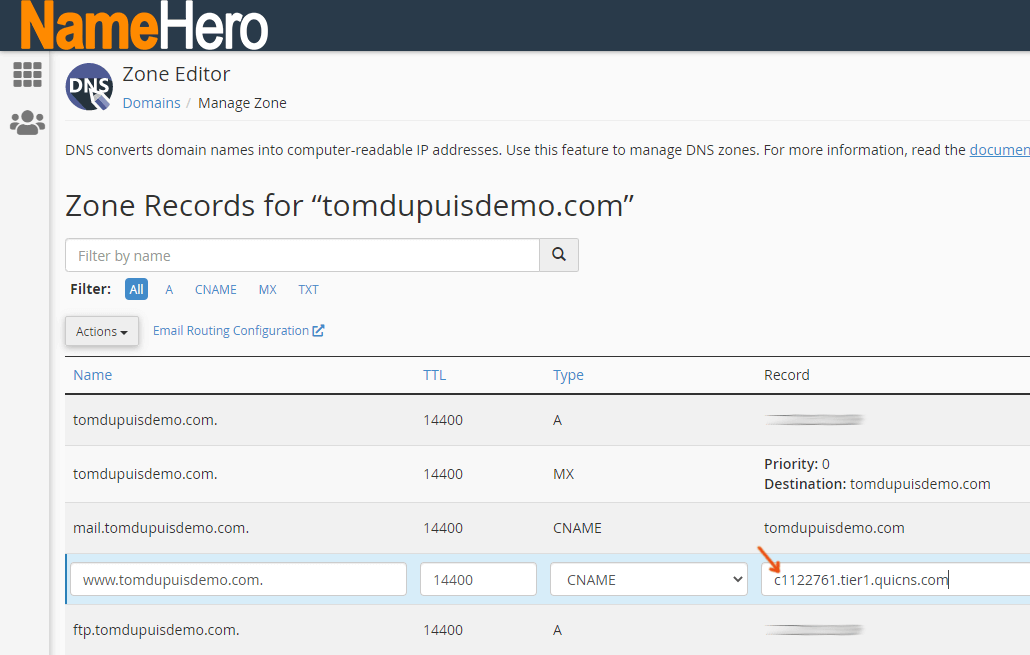
- CNAME: copy the address from QUIC.cloud and login to your hosting panel (i.e. cPanel). Go to Zone Editor → Manage and find your domain (www.tomdupuisdemo.com). Click “edit” and change the record (tomdupuisdemo.com) to the URL from QUIC.cloud. Note this only works if your site is using the www version in your WordPress General settings.

Step 6: Verify QUIC.cloud’s CDN is working. You should see a confirmation message in your QUIC.cloud dashboard (i.e. Using DNS when using QUIC.cloud’s DNS). Eventually, you’ll see traffic is served through QUIC.cloud in the Analytics settings. You can also do an HTTP/3 Test.
Step 7: Configure the “CDN Config” settings in QUIC.cloud. Here are a few tips:
- Enable static cache (unless you’re using another CDN to cache static files)
- Enable QUIC backend which lets QUIC connect to your server via QUIC and HTTP/3.
- The Standard Plan gives you access to security and anti DDoS features with reCAPTCHA and WP Brute Force Defense, restricting XML-RPC, and includes settings for WordPress.
Step 8 (Optional): QUIC.cloud’s IPs are automatically whitelisted as of v.1.7.13, so you shouldn’t need to do anything. But I included the link to their IPs in case you need them.
Step 9: Change from the free plan to the standard plan if that’s what you want to use.
Step 10: Select the regions you want to use.
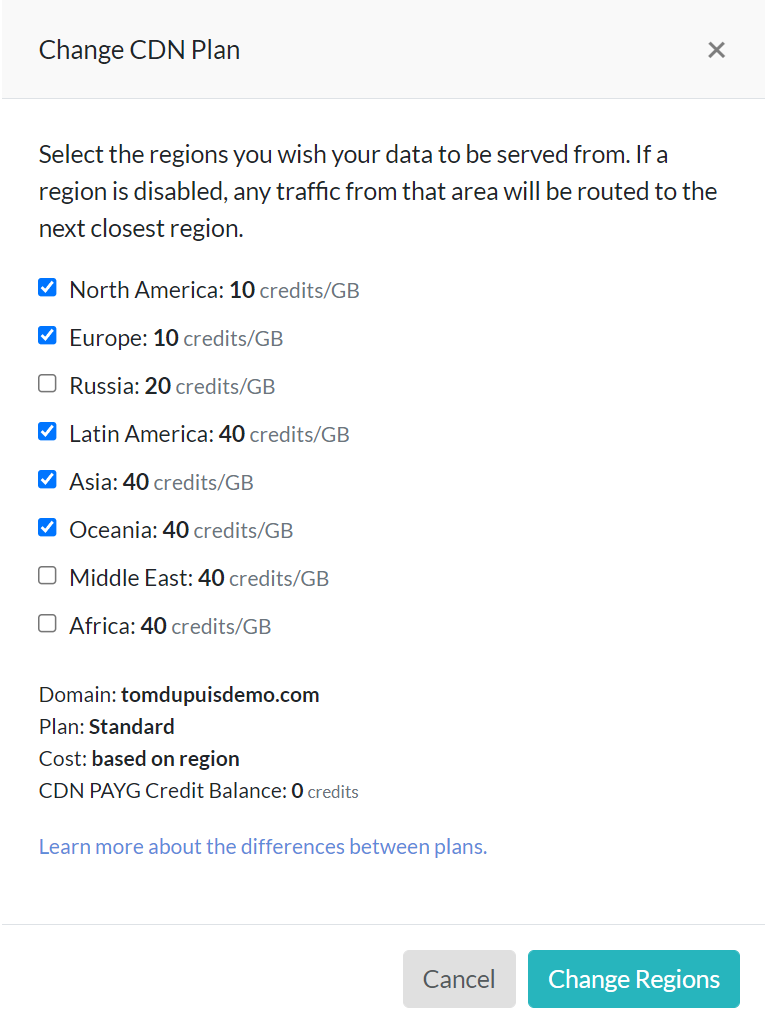
5. Image, Page Optimizations, And LQIP
Just a reminder that QUIC.cloud also takes care of image + page optimizations and includes things like critical CSS (CCSS), Unique CSS (UCSS), and LQIP (Low Quality Image Placeholder).
If you want to use these features, enable them in your LiteSpeed Cache settings. Your QUIC.cloud dashboard has a tab for each where you can monitor usage and other details.
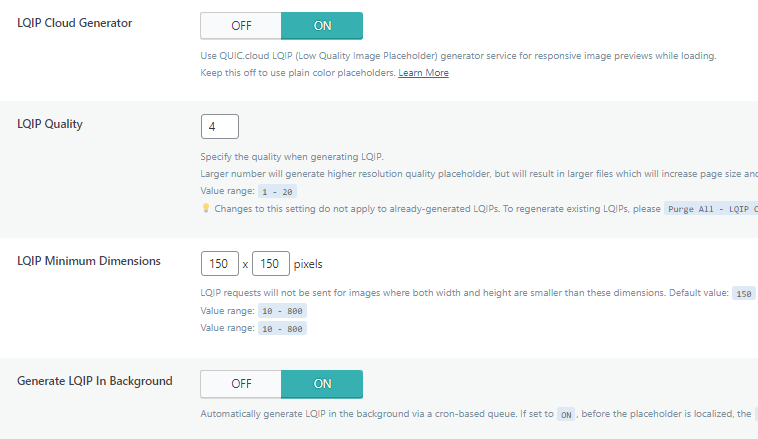
6. CDN Config Settings
I’m just adding this to show you just some of the settings in QUIC.cloud (i.e. CDN config).

7. Final Thoughts
This is the ideal setup IMO:
- DNS: Cloudflare
- Static assets: Cloudflare or BunnyCDN
- Then use QUIC.cloud (standard plan) for dynamic assets + other QUIC services
You get the best of all words: Cloudflare’s fast DNS, larger PoP network from Cloudflare or BunnyCDN, then QUIC takes care of HTML caching, HTTP/3, and other services like image/page optimization. Of course it means 3 separate services, but hey, the best doesn’t mean the easiest.
Cheers,
Tom


Hi Tom,
Great content as always. Really enjoy your blogs and use them a lot for guidance with my new website. Quick (I think) question, what settings do I need to change in order to have static assets with Cloudflare and dynamic with QUIC.cloud? I currently have Litespeed cache set up on a WordPress installation with the QUIC standard plan; Cloudflare DNS is already set up.
Furthermore, once I have the above setup, can I sue Cloudlfare’s APO for static assets? Would that improve performance although QUIC is taking care of the dynamic assets?
Looking forward to hearing from you. Keep up the great work!
Hey Gio,
I generally recommending serving both static/dynamic files from the same CDN to avoid things getting messy. But you can change whether static/dynamic files are served from QUIC in their dashboard. In this case, it sounds like you would disable static assets in QUIC, then in your Cloudflare DNS settings, use the orange cloud to make it “proxied” instead of DNS only. I haven’t done this personally… just a guess :)
I’m thinking to switch to quic cloud for both static and dynamic DNS. Any ideas how much traffic the free plan can handle ? And what is the real cost for using the pro version with Quic cloud? Their pricing plan is very confusing to understand
Yeah, I had to read it a few times to understand.
The free plan has unlimited bandwidth but only uses 6 PoPs in US/EU without DDoS protection, and still comes with HTML caching. Paid plan uses all 80 PoPs with DDoS protection.
You can also get a certain amount of free credits depending on whether your host uses LiteSpeed server or LiteSpeed Enterprise.
Just to give you an idea, BunnyCDN is $.01 – $.06/GB while QUIC is $.01 – $.04/GB (so it’s probably cheaper but then again, they mark it out like it’s on sale now… but it’s been like that for a while). It’s also needed for page/image optimizations so those require credits too.
I don’t think it should be much for smaller sites and is comparable to other CDN’s pricing. Maybe test it for a few days and see what it runs you?
Hi Tom, this is a super amazing guide. I still haven’t build my website yet but I am planning to soon by using LS and QUIC.
What I don’t understand in step 4 and step 5, is what is the faster method? QUIC.cloud Cloudflare’s DNS? If so, do I have to pay for Cloudflare as well? BEcause it will means double payment: QUIC.cloud Cloudfare. I was thinking that QUIC.cloud is a better to replace Cloudfare not to use them together.
Thanks a lot in advance for your answer! Merry Christmas
Cloudflare’s DNS is free so no need for double payment. I prefer Cloudflare’s DNS but QUIC’s should also be fast. Either one is fine tbh.
Hi Tom. Thanks a lot for taking the time to reply my question. Awesome, I will follow your suggestion. All the best!
Happy Holidays Carlos!