The main complaint I have with BunnyCDN (and it’s a big one) is no full page caching.
I used it with Cloudflare APO before moving to Cloudflare Enterprise on Cloudways, then eventually Rocket.net. I wouldn’t call it the fastest CDN, but it still ranks high on cdnperf.com, has a decent sized network, lots of settings, yet is simple to setup using their BunnyCDN plugin.
FlyingCDN (from FlyingPress) also uses BunnyCDN which is cheaper than going through BunnyCDN directly because it includes Bunny Optimizer (for image optimization) and geo-replication for $.03/GB. If you were to buy these through BunnyCDN, it’ll probably cost more.
If you use FlyingCDN, there’s no need to configure these. Otherwise, use this guide and lmk if you have questions. BunnyCDN also has good documentation and an even better support team.
- Can I use BunnyCDN with Cloudflare?
- BunnyCDN vs. FlyingCDN (and other CDNs)
- Create a pull zone in specific regions
- Add pull zone name to BunnyCDN’s plugin
- Add CDN URL to your cache plugin
- Make sure assets are served from BunnyCDN
- Use a custom CDN URL
- Force SSL
- SafeHop
- Caching settings
- Perma-cache
- Security settings
- Traffic manager
- Header settings
- Bunny Optimizer
- Edge rules
- Network limits
1. Can I Use BunnyCDN With Cloudflare?
Even though many people told me not to use 2 CDNs at the same time, I did and had 0 problems. Gijo Varghese (FlyingPress developer) also recommends Cloudflare + BunnyCDN:

Most bandwidth will be offloaded to BunnyCDN, so take that into account when figuring out pricing. If this doesn’t work for you, just use Cloudflare APO since full page caching is essential.
2. BunnyCDN vs. FlyingCDN (And Other CDNs)
I didn’t even bother comparing WP Rocket’s RocketCDN because it’s awful.
| BunnyCDN | FlyingCDN By FlyingPress | FlyingProxy Cloudflare Enterprise | Cloudways Cloudflare Enterprise | Rocket.net Cloudflare Enterprise | |
|---|---|---|---|---|---|
| Speed (Tbps) | 80 | 80 | 192 | 192 | 192 |
| PoPs | 114 | 114 | 285 | 285 | 285 |
| Full page caching | Only geo-replication for extra $ | Only geo-replication (included) | APO | x | APO |
| HTTP/3 | x | x | ✓ | ✓ | ✓ |
| Brotli | ✓ | ✓ | ✓ | ✓ | ✓ |
| Smart routing | ✓ | ✓ | x | ✓ | ✓ |
| Load balancing | ✓ | ✓ | ✓ | ✓ | ✓ |
| WAF | ✓ | ✓ | ✓ | ✓ | ✓ |
| DDoS protection | ✓ | ✓ | ✓ | ✓ | ✓ |
| Image optimization | Bunny Optimizer (extra $9.5/mo) | Bunny Optimizer (included) | Mirage/Polish | Mirage/Polish | Mirage/Polish |
| Compression | ✓ | ✓ | ✓ | ✓ | ✓ |
| WebP | ✓ | ✓ | ✓ | ✓ | ✓ |
| Mobile image resizing | ✓ | ✓ | ✓ | ✓ | ✓ |
| Bandwidth | Unlimited | Unlimited | 100GB | 100GB | Determined by hosting plan |
| Price | $.01 – $.06/GB | $.03/GB | $10/mo | $5/mo | Free w/ hosting |
3. Create A Pull Zone In Specific Regions
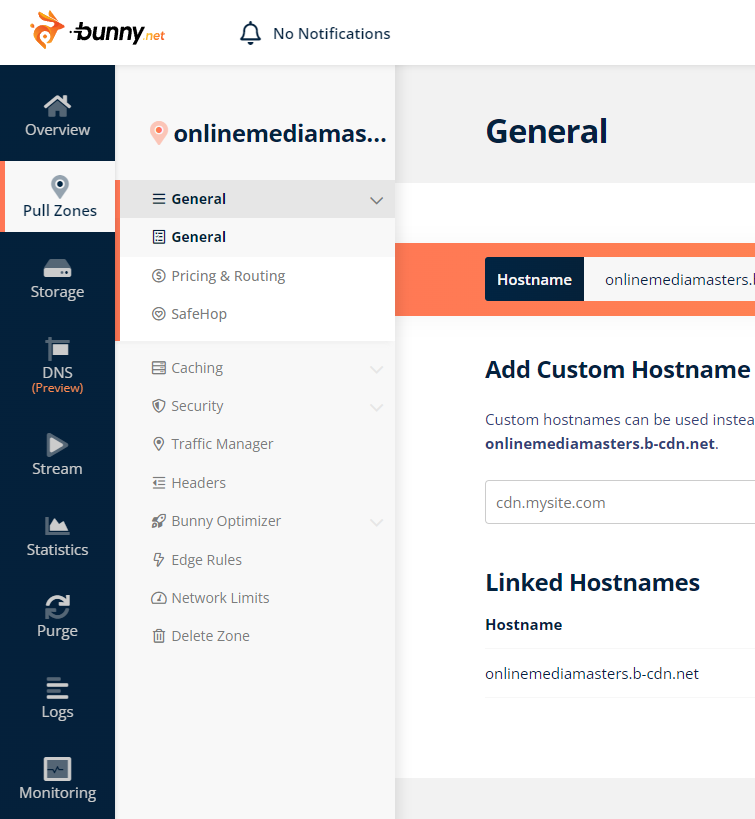
I’ll show you how to set up BunnyCDN and you can learn about features, pricing, and other things along the way. Once you’re signed up, the first step is to create a pull zone.
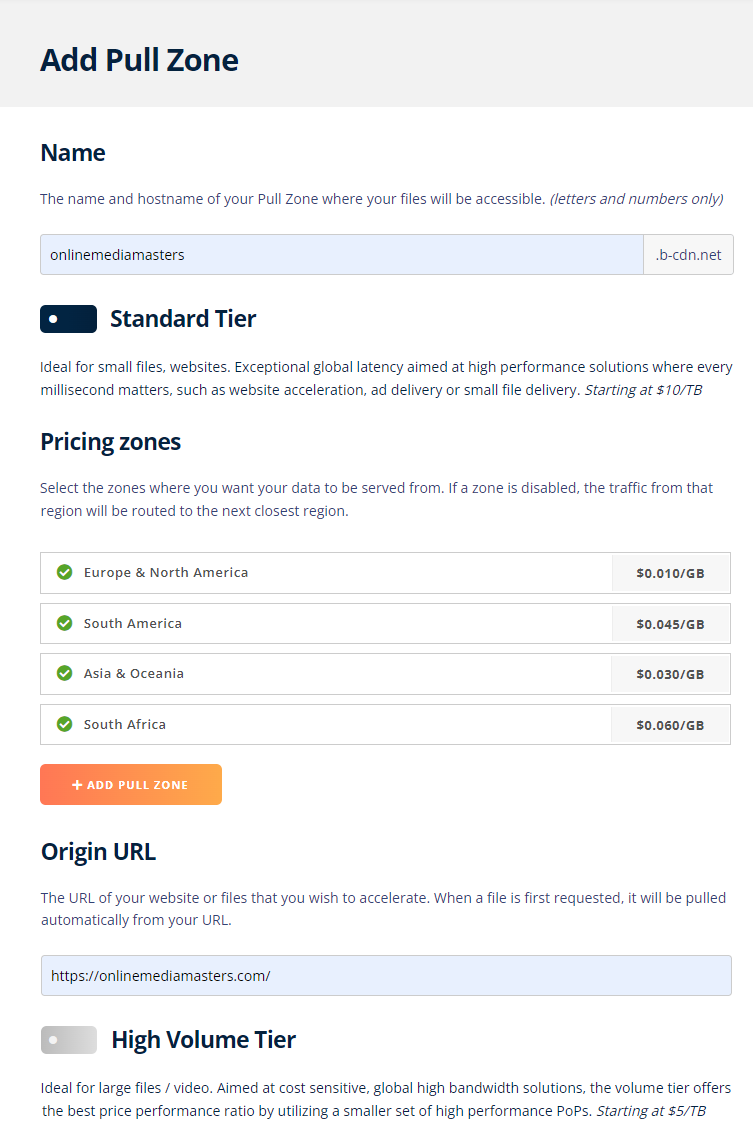
Create a pull zone under pull zones → add pull zone. Follow the same formatting shown in the screenshot below. Name: onlinemediamasters, origin URL: https://onlinemediamasters.com/
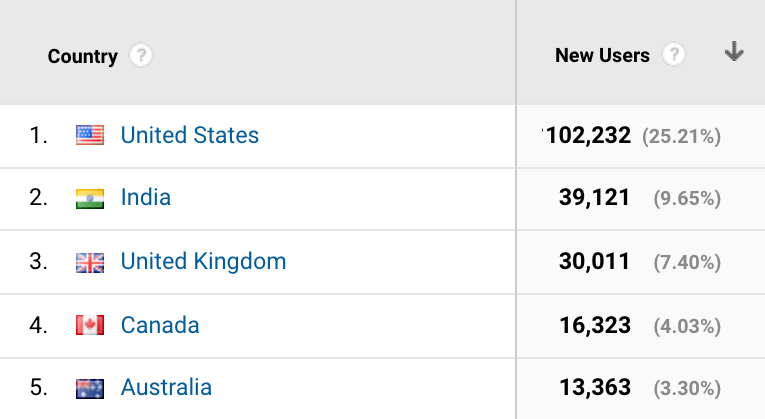
You’ll also select the pricing which is based on regions. Since I don’t have many visitors from South Africa and it was the most expensive region ($0.06 /GB), I disabled it. Just take into account where your visitors are from and how expensive the bandwidth is. You can check your hosting account or Cloudflare to see how much bandwidth your site is using, then use it to get an estimated monthly cost based on your current bandwidth (smaller, optimized sites cost less).
When you’re done, click “Add Pull Zone.”
4. Add Pull Zone Name To BunnyCDN’s Plugin
When you’re done with the first step, you will see this page:
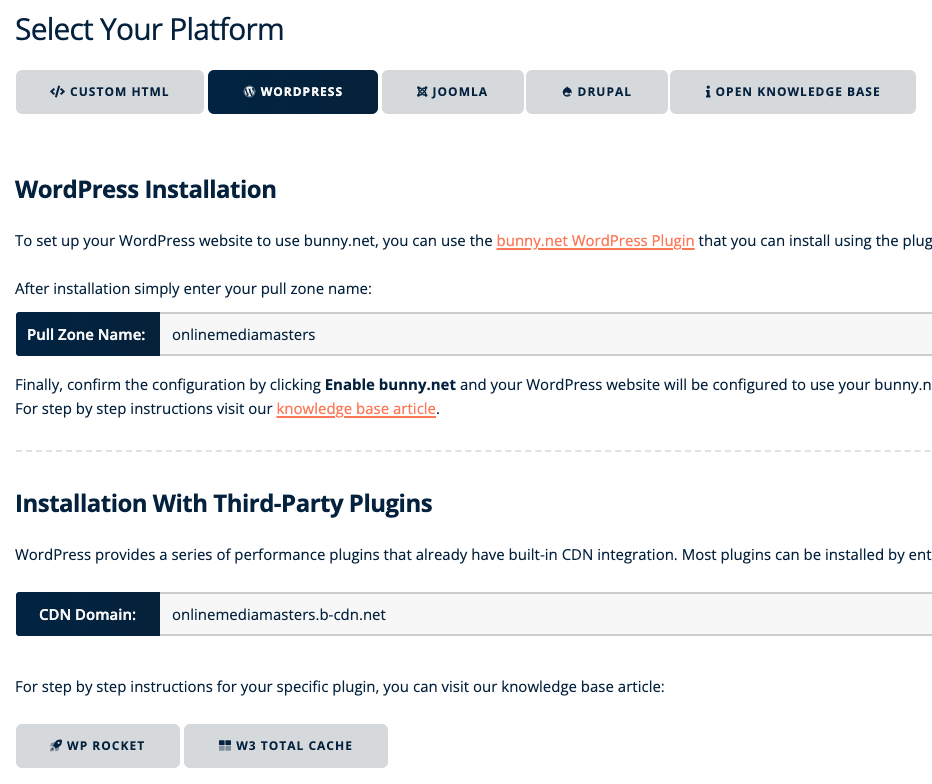
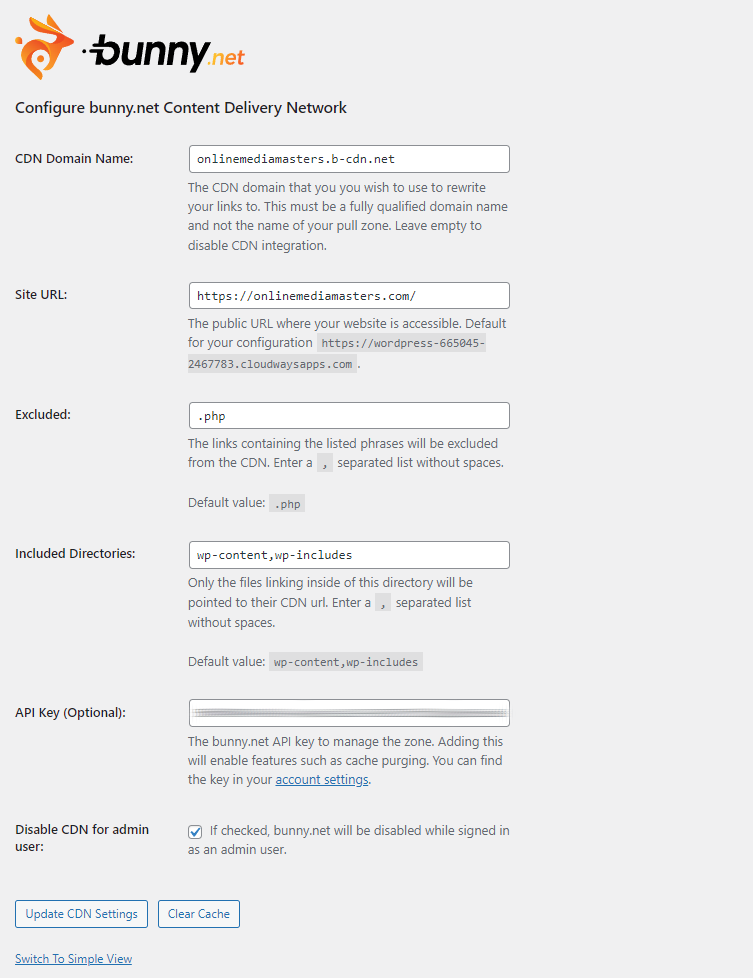
Install the BunnyCDN plugin and add your pull zone name. When you click advanced settings, you can add your API key (found in your account settings) which lets your purge cache directly in the BunnyCDN plugin. Otherwise, you usually shouldn’t need to configure anything else here.
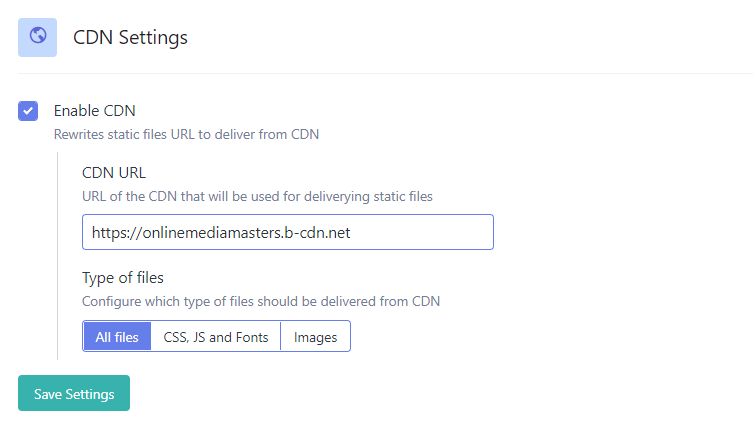
5. Add CDN URL To Your Cache Plugin
In addition to setting up the BunnyCDN plugin, you should also add your CDN URL into your cache plugin’s CDN settings. This can help serve even more assets from the CDN. BunnyCDN’s support recommended this when I noticed several assets weren’t being served, and this fixed it.
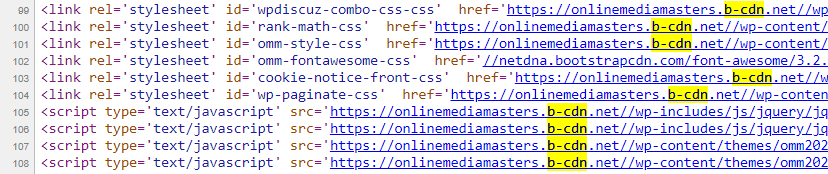
6. Make Sure Assets Are Served From BunnyCDN
View your source code and make sure files are being served from BunnyCDN (i.e. images, CSS, JavaScript, fonts). You may need to clear cache, purge the pull zone, or just wait until it updates.
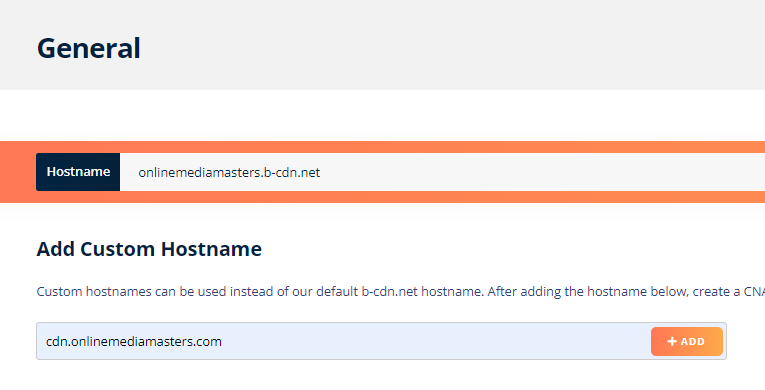
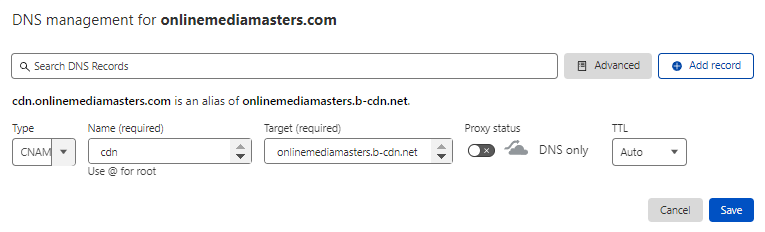
7. Use A Custom CDN URL
Instead of mywebsite.com.b-cdn.net, you can make your hostname cdn.mywebsite.com.

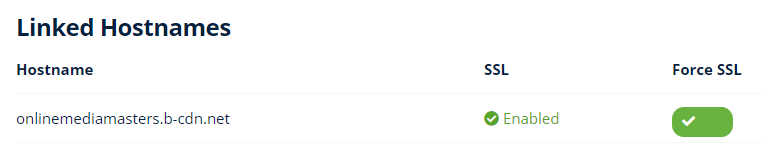
8. Force SSL
In the next few steps, I’ll will walk you through the BunnyCDN settings:
You can start by forcing SSL in the General settings. This makes sure visitors are on a secure connection by redirecting HTTP traffic and prevents duplicate content according to BunnyCDN.
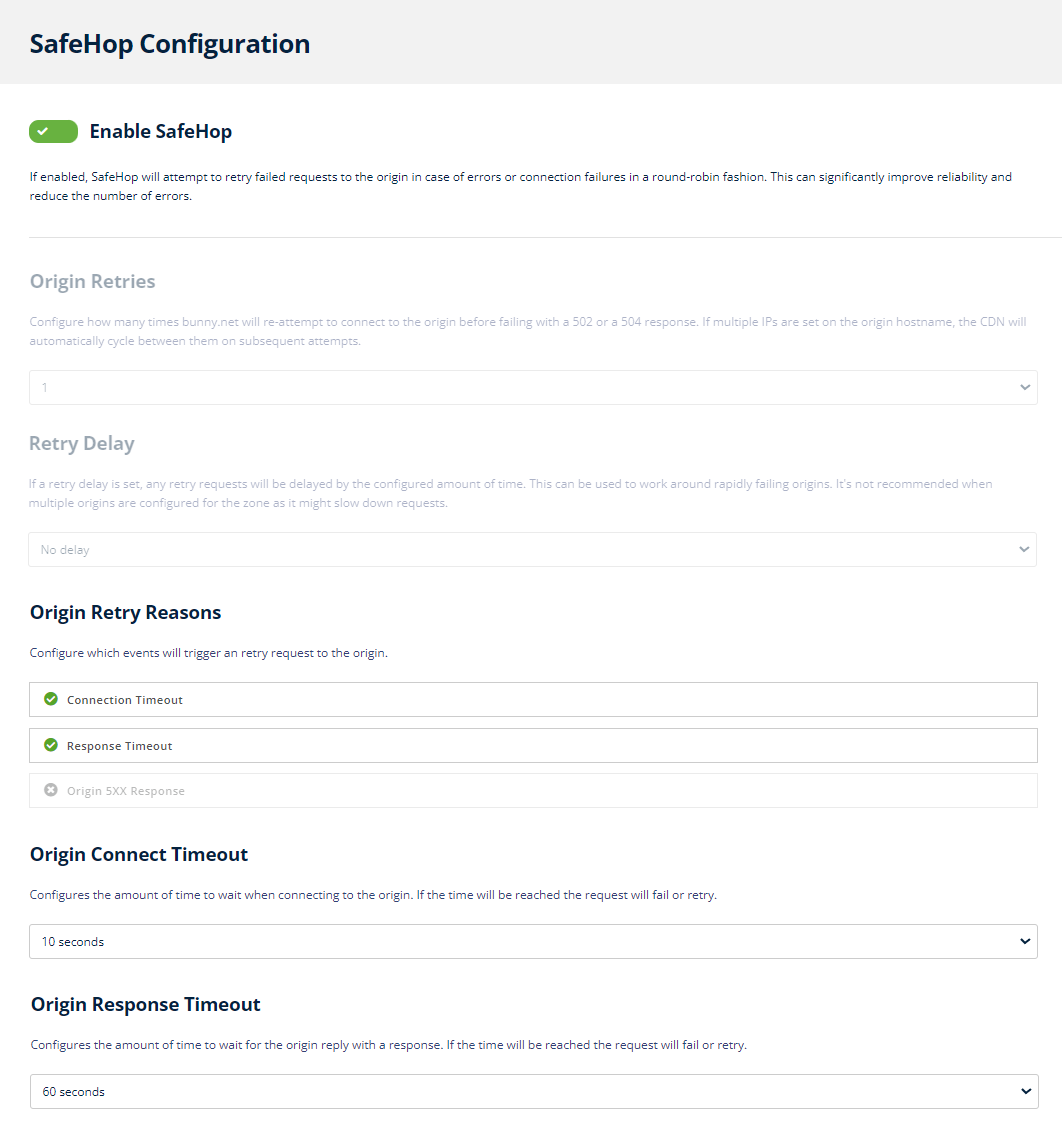
9. SafeHop
If BunnyCDN fails to connect to the origin, you can have it retry which improves reliability.
- Enable SafeHop – set this to ON so a retry will be made.
- Origin Retries – I set this to 1 so only 1 retry will be made
- Retry Delay – I set it to no delay so it will be made immediately.
- Origin Retry Reasons – default connection/response timeout is fine.
- Origin Connect + Response Timeout – I set these both to the maximum amount of time (10s origin connect timeout, 60s origin response timeout) until they’re considered failed.
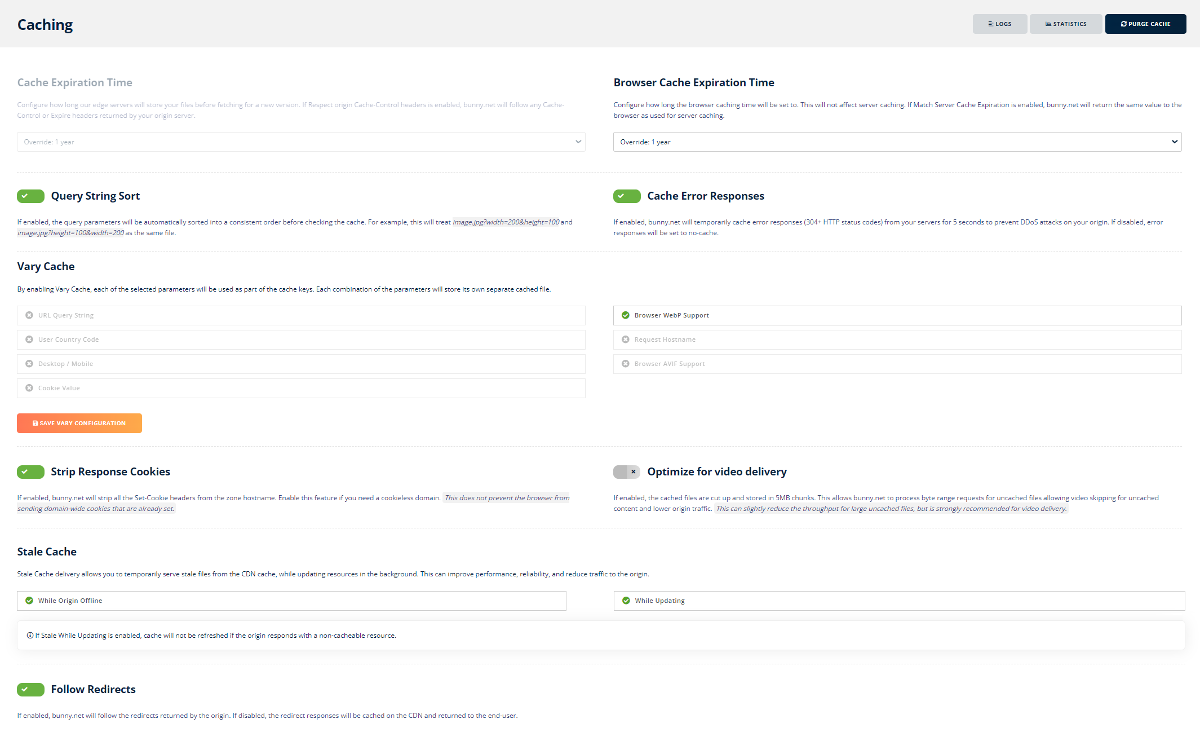
10. Caching Settings
- Browser Cache Expiration Time – you can either set this to match server cache expiration or override and set to 1 year, since Google suggests 1 year for static assets.
- Query String Sort: ON – two URLs with different query strings will be saved/returned as a single file since they most often have the same result (this prevents duplicating caching).
- Cache Error Responses – prevents DDoS attacks with temporary caching. BunnyCDN says “when enabled, any response with the status code higher than 304 will no longer get cached at all, making sure your content only gets cached when it was supposed to be.”
- Vary Cache – enable browser WebP support. Gijo Varghese from WP Speed Matters says it “tells BunnyCDN to deliver separate files for browsers with or without WebP support.” BunnyCDN also has examples of how the other options can be used, like using a single pull zone for multiple sites or serving different files based on the user’s country/mobile device.
- Strip Response Cookies: ON – strips cookies received from the origin server so clients won’t receive the Set-Cookie response header (disabling this can lead to security risks).
- Optimize For Video Delivery: OFF – only needed if you host videos on your website which can speed up the delivery by breaking videos into chunks so it can build a faster response.
- Stale Cache – I enabled both while origin is offline as well as while updating. While the cache is updating or if the origin is offline, BunnyCDN will temporarily serve a stale cache.
- Follow Redirects: ON – when enabled, it caches 301/302 redirects returned by your origin.
11. Perma-Cache
Perma-cache is also known as geo-replication. When turned on, BunnyCDN automatically copies your files to their storage zones. Files will then be pulled from the closest zone and all future requests to files won’t hit the origin. This improves cache/hit ratio and reduces latency.
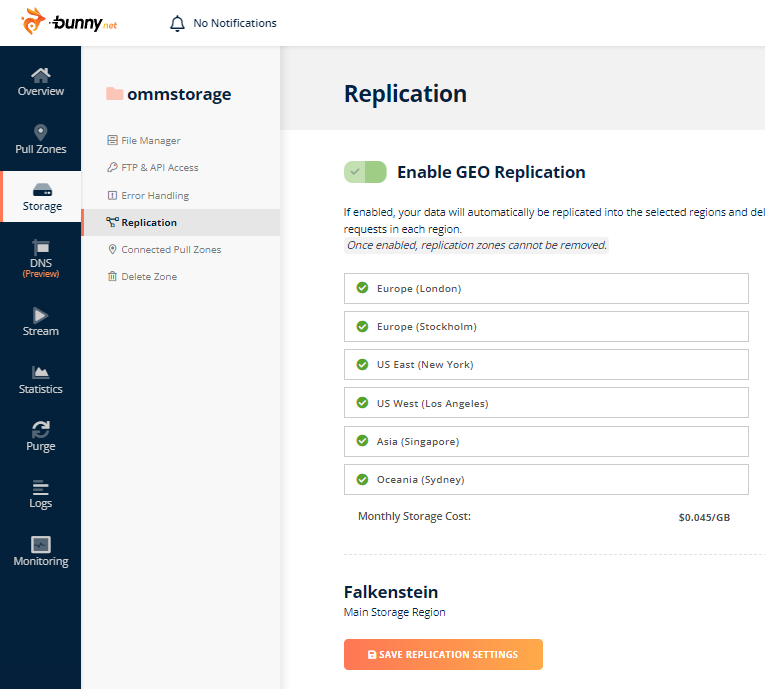
Once you enable perma-cache, go to Storage → Add Storage Zone. Give your storage zone a name (your business name is fine), select your main storage region, then click “Enable Geo-Replication.” You’ll be prompted to select the regions where you want your files to be replicated.
The price is $0.010/GB for the first 2 regions (including your main storage region) then $0.005/GB for each additional region. You can just select regions where you have lots of visitors.
When you’re done, click “Add Storage Zone.”
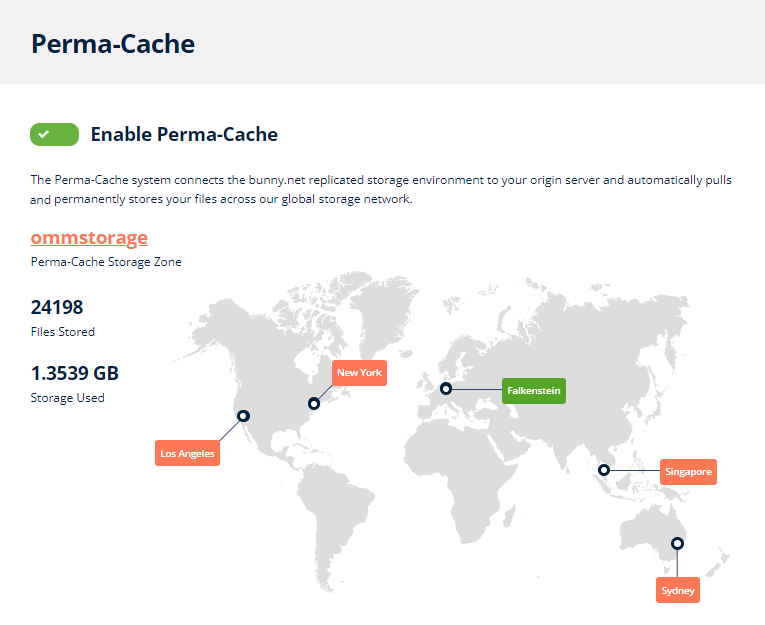
And if you click your storage name (ommstorage), you’ll get a new set of menus where you can use the file manager to upload/access files from your edge storage zone, error handling settings, and the replication tab where you can add more storage zones in case you ever want to expand.
For FlyingPress users, FlyingCDN has BunnyCDN’s geo-replication built in for free.
12. Security Settings
General
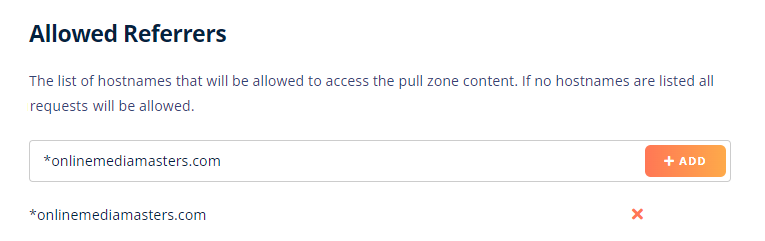
These are used to block specific requests, referrers, and IPs from accessing the pull zone. For example, websites hotlinking my images has always been a big problem for me. I set up hotlink protection by adding my site to allowed referrers so only my site has access to the pull zone.
Logging
I have logging enabled for 3 days and anonymize log IPs for better GDPR compliance (you’ll sign the DPS agreement). I didn’t enable log forwarding or permanent storage of logged files.
SSL
Verify origin SSL should usually be turned ON to connect your origin via encrypted HTTPS connection while verifying the certificate on your server (a small tweak to improve security).
502/504 Error Pages
In case users see a 502/504 page, I turned whitelabel error pages ON to remove BunnyCDN’s branding. I haven’t taken the time to create a custom error page, but you would ideally do this.
S3 Authentication
Have BunnyCDN sign requests to the origin URL by adding your AWS information in the fields.
Token Authentication
BunnyCDN has instructions to control who, where and for how long content can be accessed.
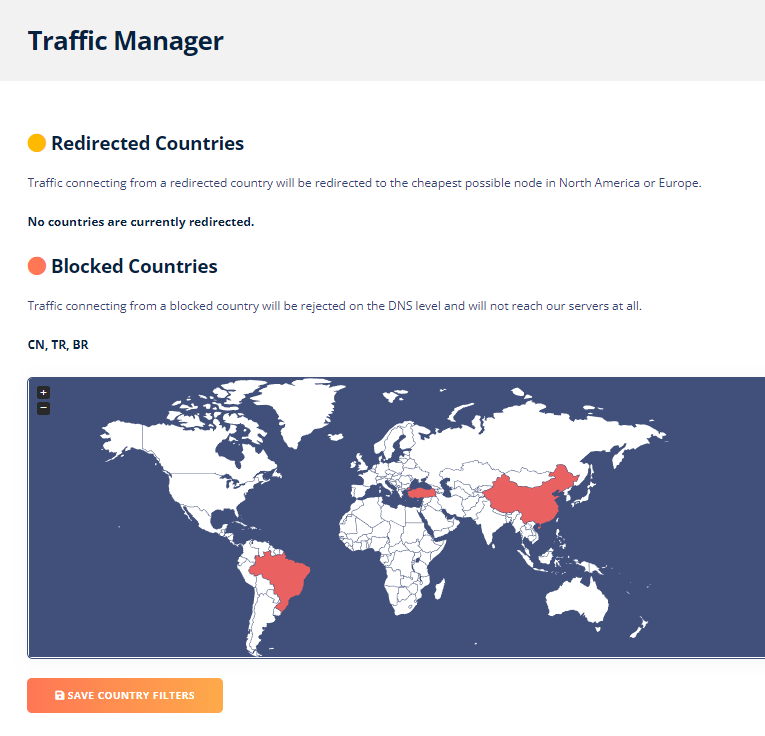
13. Traffic Manager
The traffic manager lets you allow, redirect, or block certain countries. You can click certain countries on the built-in map and they will turn white (allow), yellow (redirect), or red (block).
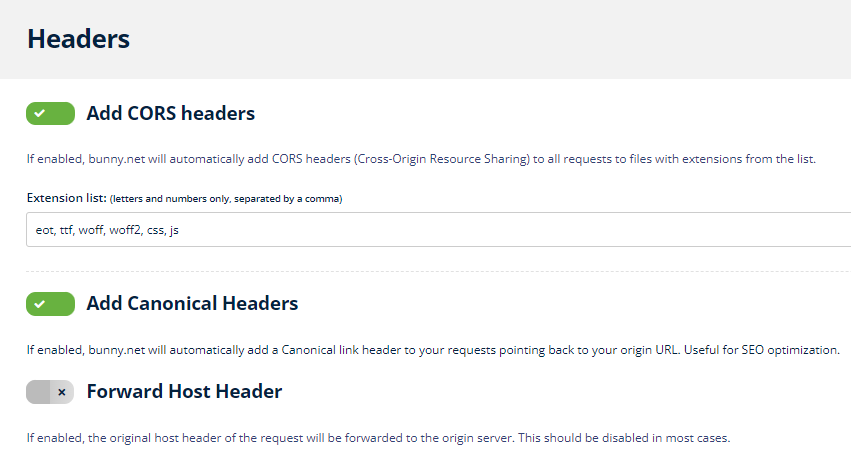
14. Header Settings
- Add CORS Headers: ON – enables CORS headers (cross-origin resource sharing) which is needed when files on your website are being loaded from a third-party domain like a CDN.
- Add Canonical Headers: ON – self-explanatory, canonical headers are good SEO practice.
- Forward Host Headers: OFF – BunnyCDN recommends leaving off (I don’t ask questions).
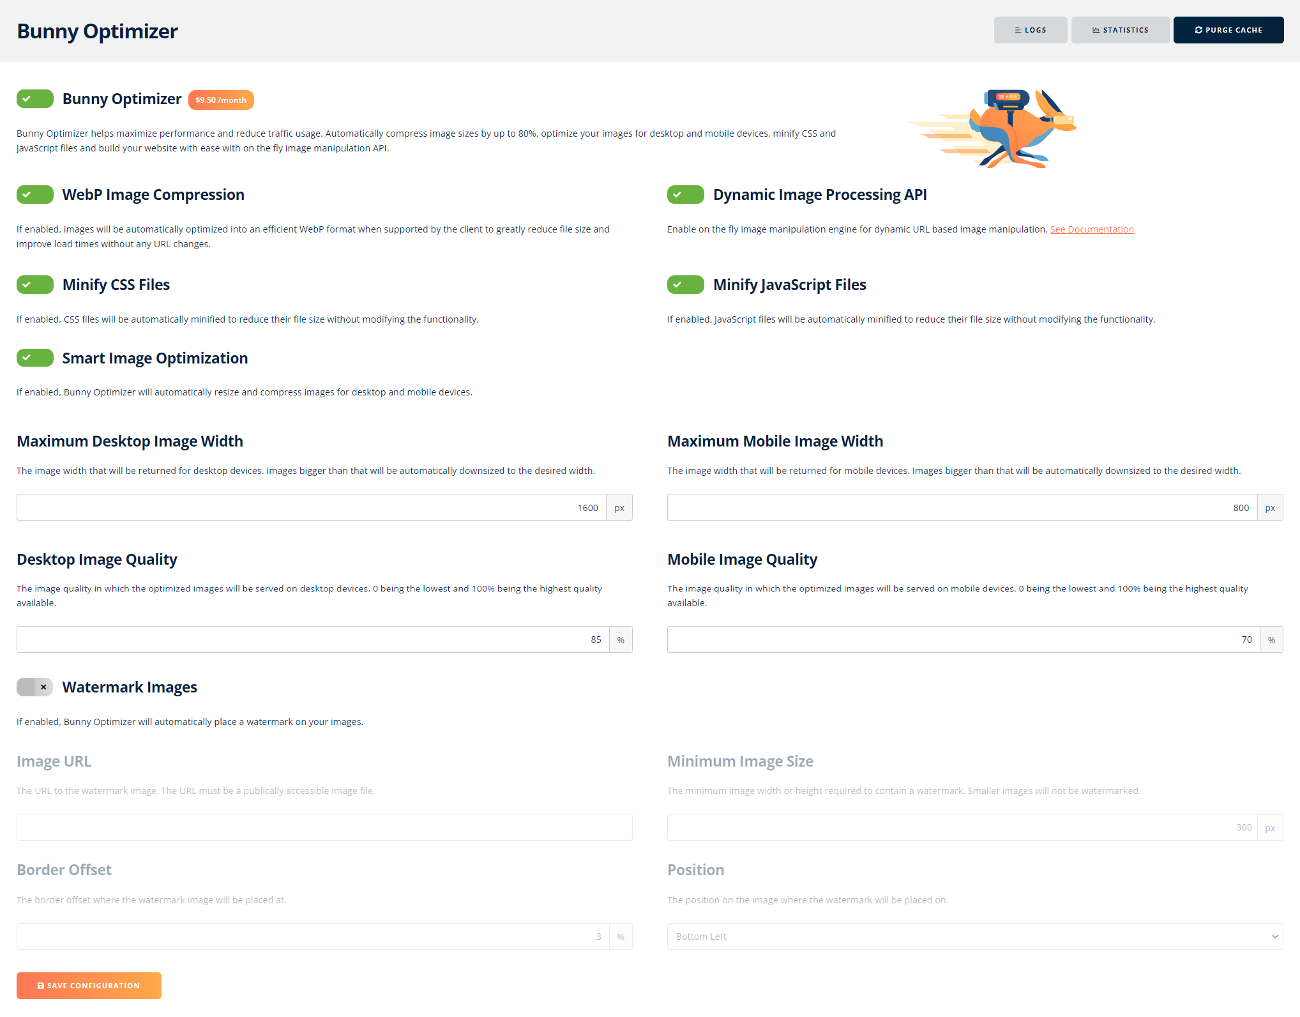
15. Bunny Optimizer
Bunny Optimizer is great because unlike image optimization plugins, it doesn’t use server resources, take up storage with backups, and resizes images for mobile (which most plugins don’t do). It’s $9.50/mo with unlimited image optimizations. If it’s too expensive, use Optimole.
| Imagify | ShortPixel | Optimole | SiteGround CDN | Bunny Optimizer | Cloudflare Mirage/Polish | |
|---|---|---|---|---|---|---|
| Compression | ✓ | ✓ | ✓ | ✓ | ✓ | ✓ |
| WebP | ✓ | ✓ | ✓ | ✓ | ✓ | ✓ |
| Mobile resizing | x | Requires ShortPixel Adaptive Images | ✓ | x | ✓ | ✓ |
| Viewport optimizations | x | x | ✓ | x | x | ✓ |
| Network optimizations | x | x | ✓ | x | x | ✓ |
| AVIF conversion | x | ✓ | ✓ | x | x | ✓ |
| AVIF support | x | ✓ | ✓ | x | x | ✓ |
| Serve images from CDN | x | Requires ShortPixel Adaptive Images | Cloudfront | SiteGround CDN | ✓ | ✓ |
| No server usage | x | x | x | x | ✓ | ✓ |
| No bloat | x | x | Offload to cloud | x | ✓ | ✓ |
| Price | Free 20MB/mo then $9.99/mo | Free 100 credits/mo then $3.99/mo | Free 5,000 visits/mo then $19.08/mo | Free ($7.49/mo for paid CDN) | $9.5/mo or $.03/GB w/ FlyingCDN | Included w/ Cloudflare Enterprises |
The settings should pretty much all be ON.
- WebP Image Compression – serves WebP images without changing image URLs.
- Dynamic Image Processing – aside from adjusting the width, height, and image quality, this lets you adjust things like sharpen, crop, brightness, and saturation. See how it works.
- Minify CSS Files – minifying CSS from a CDN can often be faster than cache plugins.
- Minify JavaScript Files – minifying JS from a CDN can often be faster than cache plugins.
- Smart Image Optimization – resizes images and adjusts quality for desktop + mobile.
- Watermark Images – add a custom watermark (logo) when BunnyCDN serves images.
- Image Classes – add image classes for dynamic image processing (such as thumbnails).
- Force Transformation Classes – only requests with image classes are used for dynamic processing. They say this prevents token authentication, temporary links, leaked images.
- Statistics – see how much traffic you saved + average compression ratio of your images.
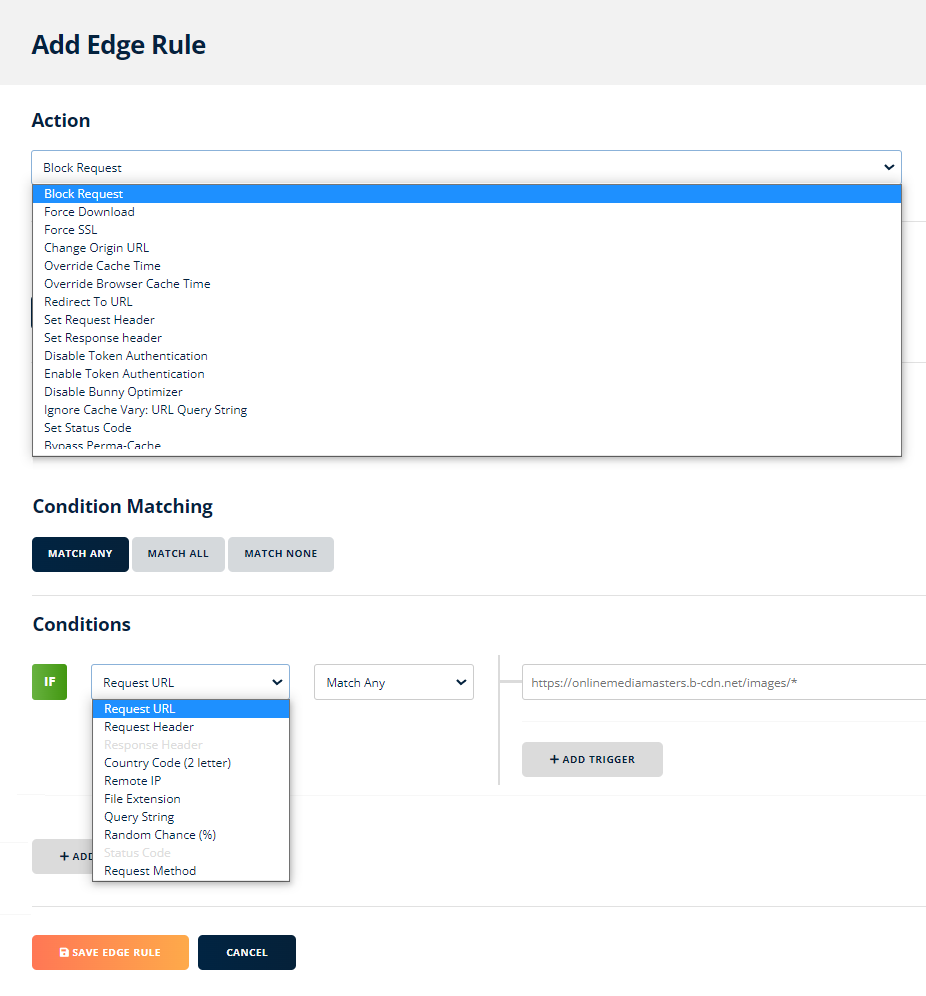
16. Edge Rules
When you click “add edge rule” you can see the available rules and conditions (triggers). BunnyCDN includes a certain amount of free rules then it costs $1/rule. One common rule is to redirect your b-cdn.net hostname to a custom hostname (cdn.mywebsite.com) but there may be other situations where you will block requests, bypass cache over cookies, override cache times, ignore vary cache for query strings (i.e. utm, fbclid), or change token authentication. BunnyCDN also shared some advice to be careful with HTTP/HTTPS schema + trailing slashes.
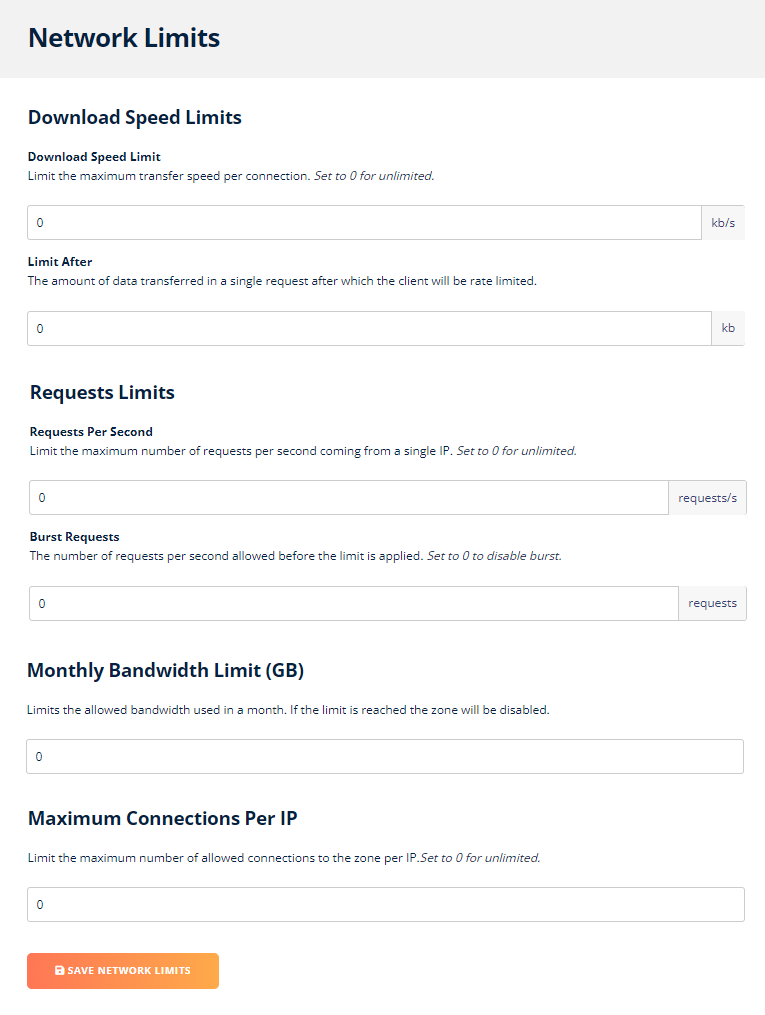
17. Network Limits
Use network limits to control CDN costs, but I have them left as the default.
What Do You Think?
Have any BunnyCDN tips you think I should add to this post? Did it help you? Let me know your thoughts in the comments – I try to respond to all them, but sometimes it takes me a few days :)
Cheers,
Tom

Hi, what would be the best option CDN for WooCommerce? Thanks you.
Cloudflare with APO and Argo Smart Routing is generally what I recommend for WooCommerce.
First of all, thank you so much for this website! It’s an absolute goldmine. I’m currently split between Rocket & Cloudways for a membership site (still running tests).. I’m wondering if BunnyCDN w/image optomisation & CloudFlare APO would be better than integrating Cloudways Cloudflare add-on…
Already using FlyingPress & Perfmatters thanks to you!
Appreciate that! Always trying to make it a bigger goldmine. Cloudways did say APO was coming in Q3 or Q4 and hopefully they fix (or already fixed) those annoying challenge pages. Once those are done, I would go with the add-on. Not sure about which one’s better right now though…
Sounds like you’ve got a good setup! Rocket will probably cost more but they’re faster. Really comes down to budget vs. desired performance.
Found this while looking for Perma Cache routing issues. Time to update this article chief. Bunny offers full-page caching. Been running it on a few sites and it’s been much better routing-wise. The only con being WordPress login issues. The workaround for now is to use CF for the admin side of things while completely locking it down on Bunny.
Thanks for the update Simon, I’ll try to get to this soon.
Hi Tom, is this Bunny config panel available to those using FlyingCDN? Also, curious why you no longer use Bunny on top of CF? Did you run into an issue? Thanks.
Hey James, Got your other comment. Sorry, just been working on getting through some stuff. I stopped using BunnyCDN once I switched to Cloudflare Enterprise as I didn’t feel it was necessary. The BunnyCDN panel isn’t available when using FlyingCDN. This is similar to third-party Cloudflare Enterprise services… you’re at the mercy of how they integrate it but lose access to the actual panel. I guess you could call these a “managed CDN solution” for better or worse.
Hi Tom, your feedback on this train of thought would be helpful: ShortPixel AI uses BunnyCDN to serve css, js, fonts, and images; and those images are served dynamically by Bunny depending upon the requesting users viewport/device. This, among other things, negates the need for Mirage/Polish on CF Ent.
Also, I’m researching APO / CF Ent, and I’m starting to get the impression that what we’re witnessing right now is a lot of frenzied, irrational exuberance. I’m personally averse to putting all my eggs in one digital basket, even if that basket is the “hallowed” ground of CloudFlare. Isn’t what we should be focused on CWVs and RUMs? And only *if* those are in need of improvement, then, as a last resort, deploy to CF? And with that being true, there really are very few sites that would meet that requirement. I mean, doesn’t “enterprise” mean anything anymore. I remember when “enterprise” meant pretty much Fortune 500. I just get skeptical when I see a big tech player like CF eating everything in sight; and then I get even more cautious when I see a religious fervor to back it up.
I appreciate your thoughts.
From what I’ve gathered, Bunny Optimizer and Mirage/Polish are both solid at image optimization and do a better job than most plugins without creating bloat/increasing memory usage. I’m not totally familiar with how ShortPixel’s AI works but it sounds like you’re correct on that.
Yes, there’s definitely a frenzy around Cloudflare APO/Enterprise. As I mentioned, you’re at the mercy of how the third-party service integrates it. Cloudways’ still doesn’t have APO, FlyingProxy doesn’t have Argo Smart Routing. But yeah, we should be focused on CWV/RUM and CF Enterprise can improve both, specifically with a faster TTFB/LCP. But whether it’s last resort or not depends on so many things. If TTFB is the underlying issue, CF Enterprise shouldn’t be a last resort especially for WooCommerce sites where the are lots of dynamic requests. For a small static site only focused in 1 region on a small budget, probably wouldn’t make sense. For a global WooCommerce site, way more important.
Hi, If I already have a WordPress cache plugin likes FlyingPress and have filled in the Bunny CDN address, do I still need to repeatedly enable the Bunny CDN WordPress plugin?
Yes, I would, it may help serve more assets from BunnyCDN. They recommended this to me and it helped.
Hi Tom,
Thanks for sharing your expertise and experience with these vendors and services. I’m on Cloudways and have opted for their Cloudflare Enterprise CDN feature. Am I good just using Cloudways Cloudflare Enterprise CDN Breeze? Would you still use Bunny CDN instead of the CF Enterprise CDN? Should I look into an alternative to Breeze?
I have a dozen small sites and I’m on the $50@month Cloudways Digital Ocean, and pay $36 a month for the CF Enterprise upgrades. I’m in the neighborhood of what it would cost to host 10 sites on Rocket.net… do you feel I’d see a significant speed increase at Rocket to go to the effort to migrate?
Thanks in advance, I really appreciate your input.
Hey John,
Yes, look into a Breeze alternative. I prefer FlyingPress but WP Rocket is (ok) too. Breeze lacks a lot of features you should see better results with either of those two (see here). Cloudflare Enterprise is Cloudways is fine, nothing needed there.
Regarding Cloudways/Rocket.net, Cloudways will be increasing prices soon, so there’s that. And yes, I think you’ll see a nice speed boost mainly because their Cloudflare Enterprise includes APO and they include a lot more cores/RAM with LiteSpeed’s PHP. It’s the same move I did only it was from Vultr HF on Cloudways. I don’t believe Cloudways offers malware protections outside of WAF on Cloudflare Enterprise, while Rocket.net does with Imunify360.
Not sure what your storage/bandwidth looks like, but that’s the main reason Rocket.net starts costing more. Just chatted with Chad from Rocket.net today and he said the Business plan (and higher) comes with Redis Object Cache Pro, so since you would need the Business plan for 10 sites, you would still be able to use that. But yeah, take a look at the storage/bandwidth you’re currently using and see which Rocket.net plan you would need. If it’s in the budget, I think it’s worth it.
They also do unlimited free migrations so IF you’re actually considering it, hopefully it shouldn’t be as much work as you think.
Hi Tom, this is a great post, as always.
I currently use FlyingCDN Cloudflare. When you say that you “take advantage of BunnyCDN with perma-cache,” do you mean FlyingCDN (which already includes BunnyCDN’s perma-cache)? Or do you have both FlyingCDN and BunnyCDN perma-cache?
And if you use both, what do you put in the CDN URL box in the FlyinPress plugin? FlyingPress’ CDN URL or BunnyCDN’s CDN URL? I’m a bit confused here…
Your site is really fast, and I’d love to get mine to that speed.
Thanks for your time!
Hey Vasco,
I recently made some changes like moving from Cloudways to Rocket.net then also started using GeneratePress.
Now that I’m using Rocket.net with Cloudflare Enterprise, I haven’t integrated FlyingCDN but will be trying them both soon. Previously, I was using Cloudflare FlyingCDN. Since FlyingCDN integrates BunnyCDN for you, you don’t need to do anything with BunnyCDN or pay for it. You would login to your FlyingCDN account and configure everything there. They have Bunny Optimizer and geo-replication (perma-cache) built-in so you would just use add your FlyingCDN URL to FlyingPress (or whatever cache plugin you’re using) to rewrite asset URLs.